SECTION D6 - TASK 6
Learn Autocad FREE. Tutorials in 3D design for learning Autocad online - Using the
UCS


Task Six
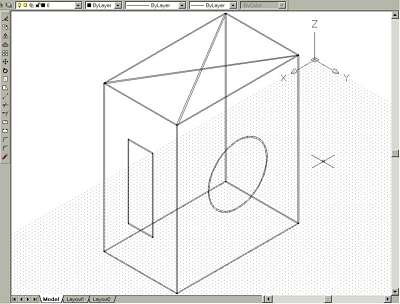
Fig Tsk 6.
The next part of learning Autocad online is understanding how the Ucs (User
Co-ordinate System) affects 3D modeling. Using the UCS is a vital but easy part
of our course to learn Autocad free. Drawing some shapes on the faces of the box
will demonstrate this.
Fig TSK 6 shows how the box will evolve, with a cross, rectangle and circle on the faces of the box. Position the Ucs to draw the circle as follows:-
| Autocad Command Sequence | Note |
| Command: ucs > | |
| Current ucs name: *WORLD* | |
Enter an option [New/Move/orthoGraphic/..etc../World] <world>:n > |
a/ |
Specify origin of new UCS or [Zaxis/..etc../X/Y/Z]<0,0,0>: x > |
|
Specify rotation angle about X axis: 90 > |
|
| Command: | |
| a. Older Autocad software does not require the 'n' modifier - move straight to the 'x' modifier on the next line. The same is true for some newer Autocad versions too. Although the prompt asks for 'n', it is possible to enter the 'x' modifier at the prompt for 'n.' |
|
The Ucs XY plane is now in the same orientation as the nearer largest vertical face. (The face showing the circle in fig TSK 6.) Circles are always created in the XY plane. Although the X direction on the Ucs is pointing left and the Y direction points upwards, it is the plane that is important, not the directions. The commands below create a construction line to position the circle, followed by the circle itself:-
| Autocad Command Sequence | |
| Command: line > | |
| Specify first point: end > | |
| of Pick the top right corner of the face with the circle | |
| Specify next point or [Undo]: end > | |
| of Pick the lower left diagonal corner of the circle face | |
| Specify next point or [Undo]: > (Return) | |
| Command: circle > | |
Specify center point for circle or [3P/2P/Ttr (tan tan radius)]: MID > |
|
of Pick the mid point of the diagonal line |
|
| Specify radius of circle or [Diameter] <30.00>: 1.2 > (ISO = 30mm) | |
| Command: |
The diagonal construction line can be removed using 'erase'.
Erase
it and then save your work before starting the next task.
Navigate to the next page (or previous page) using the circular arrow icons below.
Please feel welcome to make use of the free resources at the side and bottom of these webpages. Many of them contain very useful 3D CAD material.


For a negligible fee (about the cost of a large cola drink) the full course AND CERTIFICATE can be printed in one go. The small sums it raises cover our costs for running the site. Click here for details.